9 Stages for Painting a Casement Window Correctly

Performing in a logical order will support you get a experienced paint position when painting casement windows.
If you have Upvc home windows you won’t want to paint them, but timber home windows need portray periodically to shield them from the features.
This guidebook assumes you know about making ready woodwork for portray, but there are plenty of handy guides in our key venture section if you need to have further guidance.
Phase by Stage Guidebook to Portray a Timber Casement Window
This sequence of painting applies for every single coat of paint that you utilize, and really do not forget about to sand and thoroughly clean down amongst every layer of paint.
- Take out all the window household furniture. Make positive that what ever you use to stand on to attain the bigger components of the window is risk-free and secure (see our undertaking on utilizing ladders safely and securely)
- Pick a excellent good quality brush about 12 to 25mm (½ – 1 inch). See our types of paint brush undertaking for direction. Never load far too substantially paint onto the brush so you say in command of the paint
- Even a large window will not use a whole lot of paint so suggestion some of your paint into a modest paint kettle with a take care of which will make it so substantially a lot easier to cope with
- Always paint opening sections of any window 1st: Open up all the windows and come across a way to safe the open casements in place. This is pretty effortlessly carried out by tacking a little piece of timber to the underside of the opening sash and the other end to the underside of the sill or cill
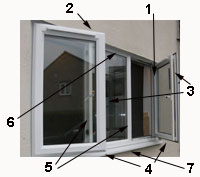
- 1st Paint the rails and stiles of the opening windows in the order shown on the numbered diagram earlier mentioned (1-4)
- Paint the areas up coming to the glass first
- Next paint the reverse side,
- At last paint the encounter that reveals when the window is closed.
- Paint any glazing bars by painting the still left aspect of every vertical bar, then the proper facet of each individual vertical bar (If you are right handed work still left to correct – if you are still left handed paint the still left facet initial followed by the appropriate)
- Do the job top rated to base on any horizonal glazing bars
- Subsequent paint the window body, employing the similar purchase as outlined previously mentioned
- Paint the cross bars
- Paint the upright bars
- Lastly paint the outer body and sill
- Permit the paint to dry for at the very least as lengthy as the paint producer suggests in advance of closing the windows, to avoid the windows sticking and detrimental the paint.
When calculating drying times you must get notice of any allowance for the situations you are portray in.
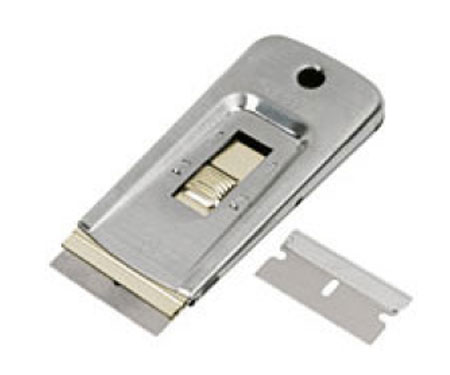
If you have produced any paint splashes or wobbly lines, you can use a window scraper like the one beneath, to thoroughly clean off any unwelcome paint from the glass. See our painting sash windows undertaking for directions on how to do this properly and neatly.
This simple move-by-step information helps you get the most effective effects by painting in a sensible get if you are presently confident about the system of painting woodwork, but if you are not certain about the hows and whys of portray casement home windows then test out the total job on How to Paint a Casement Window below for even further direction on how frequently to paint your windows and no matter whether to use primer and undercoat.